Minecraft players love collecting achievements. Some do it to brag to their online friends, others…
Rust Kits Server Plugin Guide
The Rust Kits uMod plugin grants Rust server admins the ability to give players custom item packages called kits. This is a great way to customize your modded Rust server, which is why Rust Kits is one of the most popular Rust mods.
Here is everything you need to know about using Rust Kits.
Rust Kits Features
The Rust Kits uMod plugin is a tool for creating item kits. With it admins can:
- Create custom item kits, including auto-kits.
- Configure item kit options and parameters.
- Set item kit permissions.
- Grant kits to players or NPCs.
Rust Kits Commands
Rust Kits provides a range of admin commands which you can enter either through the command console (press F1 to open) or the in-game chat (press T to open).
Chat commands need to be prefixed with the forward-slash ( / ). For example, the kit new command becomes /kit new if entered through the chat window.
The following commands are available to all players:
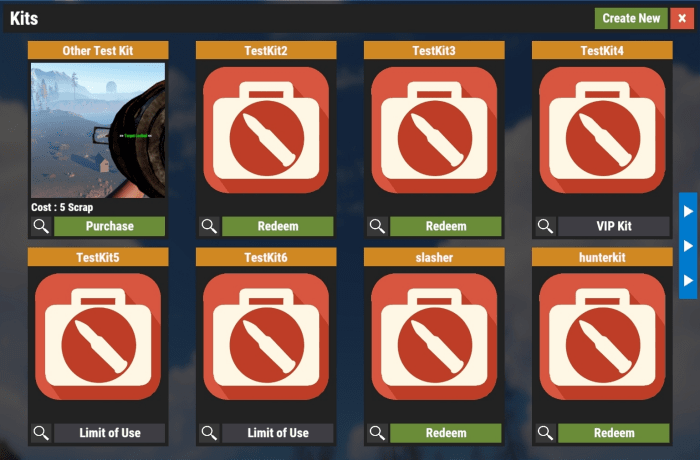
- kit – Opens the Kit menu.
- kit <kitname> – Claims the specified kit.
The following commands are for admins only:
- kit autokit – Toggles whether players can receive an auto-kit on respawn.
- kit new – Starts creating a new kit.
- kit edit <kitname> – Edits the specified kit.
- kit delete <kitname> – Deletes the specified kit.
- kit list – Lists all stored kits.
- kit give <player name or id> <kitname> – Gives the target player the specified kit.
- kit givenpc <kitname> – Gives the NPC you are looking at the specified kit.
- kit reset – Wipes player usage data.
Rust Kits Permissions
By default, only Rust server admins can use Rust Kits commands. If you want to grant all players permission to use Rust Kits commands, you can do so with the following console command:
oxide.grant [user or group] [name or steam id] [kits.admin]To remove a permission, use:
oxide.revoke [user or group] [name or steam id] [permission]Custom Permissions
In addition to giving players permission to use Rust Kits commands, you can also create custom permissions for particular kits. This gives you more fine-grained control over who has access to each particular kit.
Let’s use an example to illustrate how to make a custom permission called “SponsorPerms” for a kit called “SponsorKit” aimed at users called “Sponsors”. Open the command console with F1 and follow the procedure:
- Start editing the kit with the command:
kit edit "SponsorKit"- Set the permission for the kit with:
kit permission "SponsorPerms"- Create a user group called “Sponsors”:
oxide.group add "Sponsors"- Grant the group the permission:
oxide.grant group "Sponsors" "SponsorPerms"- Add a user called “John” to the permission group:
oxide.usergroup add "Mark" "Sponsors"To summarize, we included a custom Rust kit called SponsorKit within the permission SponsorPerms. We then associated the permission with the user group Sponsors. Finally, we added the user Mark to the group.
- Now Mark can redeem a SponsorKit with the command:
kitSponsorKitNote: If you want to monetize a modded Rust server, Glimpse has you covered. Sign up as a Glimpse Creator and add your modded Rust server to Glimpse using the Gaming Servers feature. Then charge for access with Glimpse’s tiered sponsorship system.
Glimpse has a 0% fees policy for Creators, so you get to keep all your earnings.
How to Create a Rust Kit
To create a kit in-game, follow these steps:
- Clear your inventory of items.
- Define and name a new kit.
- Add kit items to your inventory.
- Customize kit options.
Let’s go over each step in more detail.
1. Clear Your Inventory of Items
This is necessary to correctly specify the contents of the kit. You can move items from your inventory to a container or drop them on the ground at a safe location.
2. Define and Name a New Kit
To define a new kit and give it a name, use the command: kit <kitname>.
3. Add Kit Items to Your Inventory
You can add items to your inventory for kit-creation purposes in three different ways:
- Use the console command inventory.give “item name” “amount”.
- Pick up the items to add from another container.
- Use the Rust Kits GUI, invoked by the command kit new.
4. Customize Kit Options
Use kit options to customize Rust kits. To customize options for a kit, run the command:
kit edit "kit name"Then configure the options using the following syntax:
kit [option] [value]Here is a table with the options you can configure.
| Option | Value | Description |
| max | “number”/false | Sets how many times a player can redeem the kit. False disables the option. |
| cooldown | “time”/false | Sets the cooldown between kit redemption in seconds. False disables the option. |
| Building | “ID” | Sets a building to paste. |
| authlevel | “number” | Authorization level required to redeem the kit. |
| npconly | “true/false” | Makes the kit NPC-only. False disables the option. |
| permission | CustomPermissionName/false | Only players with the “custom permission” oxide permission can redeem the kit. False disables the option. |
| description | “description text” | Specifies a description for the kit. |
| image | ‘URL’ | Specifies an image for a kit. |
| hide | true/false | Hides a kit from the player kit list, but not the admin kit list. False disables the option. |
| xp | “xp value” | Gives the player this much XP when redeeming the kit. |
| items | Not applicable | Adds the items from your inventory to the kit. |
For example, to make an NPC-only kit containing a single rock, run the following commands in sequence:
kit "NPC kit"
inventory.give "rock" "1"
kit edit "NPC kit"
kit npconly "true"
How to Create a Rust Auto-Kit
Auto-kits are granted automatically after certain events, such as entering a Rust server for the first time or respawning after death. They are otherwise indistinguishable from regular kits.
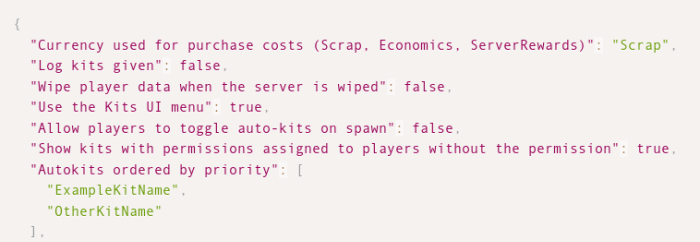
Auto-kits are configured through the Kits.json file in the /oxide/config/ subdirectory of your Rust installation directory. Open the file in a text editor and look for the following block of code:
"Autokits ordered by priority": [
    "ExampleKitName",
    "OtherKitName"
  ],
Simply replace “ExampleKitName” and “OtherKitName” with the kits you want to use and save the file. The kits in the list are then granted automatically to players on the server.
Custom Auto-Kits
If you want auto-kits to apply only to players with a specific permission level, make sure to set the appropriate kit options with the kit authlevel command.
For example, an auto-kit meant solely for players with admin permissions is configured with the command kit authlevel 2, where “2” represents admin permission credentials.
Conclusion
Rust kits are an excellent way to make your Rust server stand out. Granting a different set of items than the default makes for a unique multiplayer experience, which is what players want from a modded Rust server.
Try making a couple of Rust kits of your own, and have some fun while you’re at it!
Glimpse makes it easy for you to sell access to your Minecraft, Steam, Terraria, Rust, 7 Days to Die, Starbound, and most other gaming servers. Using our esports platform, you can connect your server directly to the platform and enable access to it within a sponsorship level.
- Sell access to your server within sponsorships
- Whitelist specific users for your gaming server
- Use webhooks to connect your server in several simple clicks
- Glimpse’s monetization system charges 0% commission so you get 100% of your earnings
Related Posts