Minecraft players love collecting achievements. Some do it to brag to their online friends, others…

How to Configure a 7 Days to Die Dedicated Server
Hosting your own dedicated multiplayer server is a great way to enhance your 7 Days to Die experience. In addition to choosing with whom you play, you also get to customize your server with server options and mods.
This guide explains how to configure a 7 Days to Die dedicated server. It assumes you’re using a Linux distribution (such as Ubuntu 20.04) as your operating system.
1. Install the Necessary Packages
To install and configure a 7 Days to Die server, you will need the following packages:
- wget
- lib32gcc1
1. First, open the terminal and update your package repositories with the following command:
sudo apt update2. Next, install the required dependencies with the command:
sudo apt install -y wget lib32gcc12. Install SteamCMD
Next, you need to install Valve’s command-line tool SteamCMD. This tool is used for managing and updating your server and game files through the command line.
1. Open the terminal and download the SteamCMD tarball with the command:
wget http://media.steampowered.com/installer/steamcmd_linux.tar.gz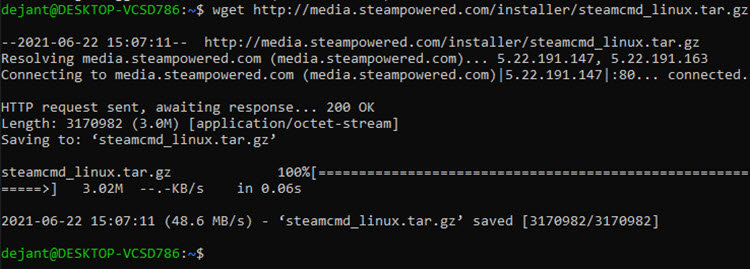
2. Once the download finishes, navigate to the directory where you downloaded the tarball and unpack it with the command:
tar -xvf steamcmd_linux.tar.gz
SteamCMD is now ready to use.
3. Install the Game
To install the game:
- Run SteamCMD with the command:
./steamcmd.shThis starts the SteamCMD REPL environment for running SteamCMD commands.
- You can use SteamCMD as an anonymous user with the command:
login anonymousOr you can log in with your Steam account credentials with the command:
login [your username] [your password]- After logging in, choose where you want to install the 7 Days to Die server files (you can choose any directory you like) with the command:
force_install_dir ~/7dtd_server/- Next, install the files using the
app_updatecommand with Steam’s ID for the 7 Days to Die server:
app_update 294420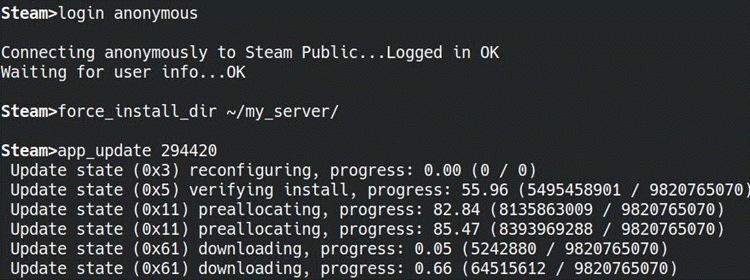
- Once the installation is finished, you can close SteamCMD with the command:
quitGlimpse has built-in support for running private 7 Days to Die servers. Sign up with a creator account and use the Gaming Servers feature to manage users and charge for access.
4. Configure the Game Server
All game server configuration is done by editing the serverconfig.xml file. You can find the file in the directory where you unpacked the server files (~/my_server/ in our example).To configure the server:
1. Open the serverconfig.xml file in your text editor of choice.
The file contains a list of properties, each containing a name attribute (e.g., name=“ControlPanelEnabled”), a value attribute (e.g. value=“false”), and a comment describing what the property does (e.g. <!– Enable/Disable the web control panel –> ).

2. To change a property, simply change the associated value. Check the comment to find out what changing each value does.
3. Once you’re done editing, save the file and close the text editor. The changes will take effect the next time you start the server.
5. Start the Server
To start you server:
1. Navigate to the directory where you unpacked the server files.
2. Run the command:
./startserver.sh -configfile=serverconfig.xmlYou can stop the server at any time by closing the terminal window.
6. Connecting to the Server
Once the server is up and running, players join easily.
1. Player click Join Game in the main menu of the game.
2. They enter the IP address of the server in the IP field.
3. Enter the server port in the Port field.
4. Click Connect.
Check out our comprehensive list of 7 Days to Die Console Commands.
Conclusion
If you’re a 7 Days to Die fan, running your own dedicated game server will allow you to customize the game to your liking.
You can create a comfortable environment so your friends can play in peace, run a cutthroat server aimed at giving players a true challenge, or anything else you can think of.
Glimpse makes it easy for you to sell access to your Minecraft, Steam, Terraria, Rust, 7 Days to Die, Starbound, and most other gaming servers. Using our esports platform, you can connect your server directly to the platform and enable access to it within a sponsorship level.
- Sell access to your server within sponsorships
- Whitelist specific users for your gaming server
- Use webhooks to connect your server in several simple clicks
- Glimpse’s monetization system charges 0% commission so you get 100% of your earnings
Related Posts